哥斯拉插件开发指南——初入茅庐
前言
什么是哥斯拉工具?

哥斯拉是下一代webshell管理工具。
学会编写哥斯拉插件,你不仅可以绕过waf,还可以编写更多的功能,甚至哥斯拉的服务端可以脱离webshell,在数据库中运行,如SqlServer的CLR。
首先简单阅读哥斯拉插件Api:
https://beichendream.github.io/godzillaApi/
接下来我们将简单的学习一下怎么搭建环境,并编写插件。在后续的文章中我们会编写带有实际功能的插件,本文我们只是简单了解一下。
新建一个哥斯拉插件项目
首先打开IntelliJ?IDEA,新建一个Java项目

一直点Next

写一个项目名

新建好之后,点击项目配置
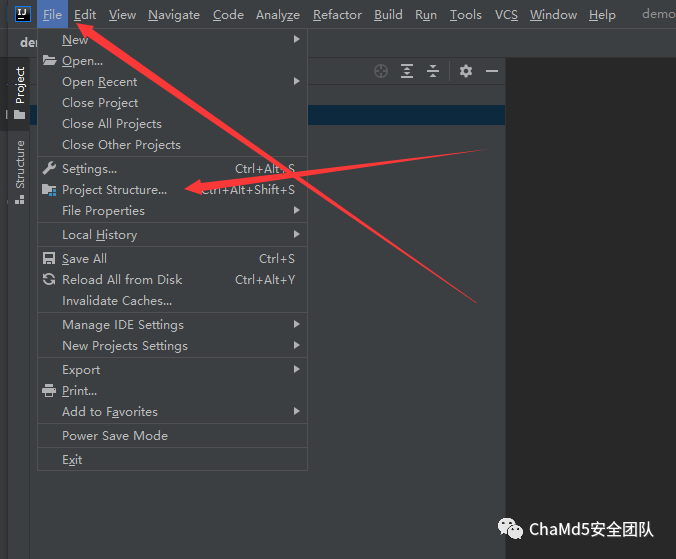
点击加号

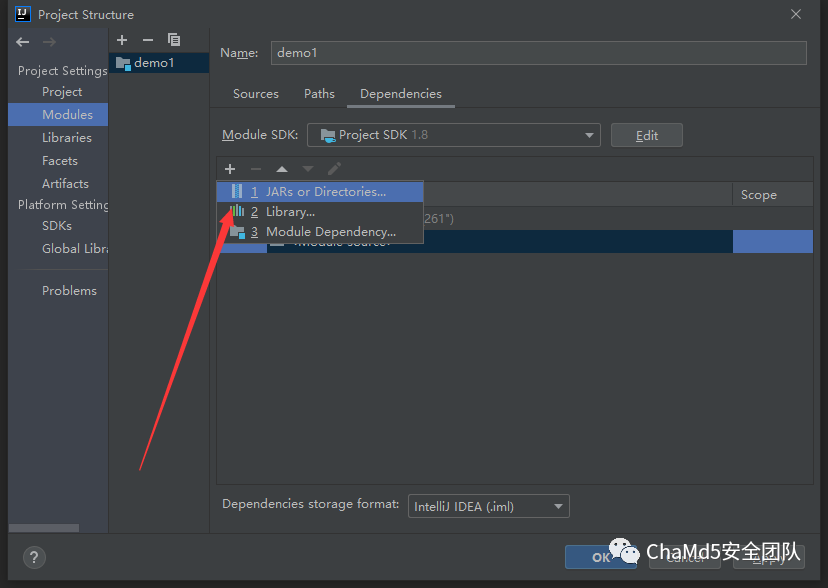
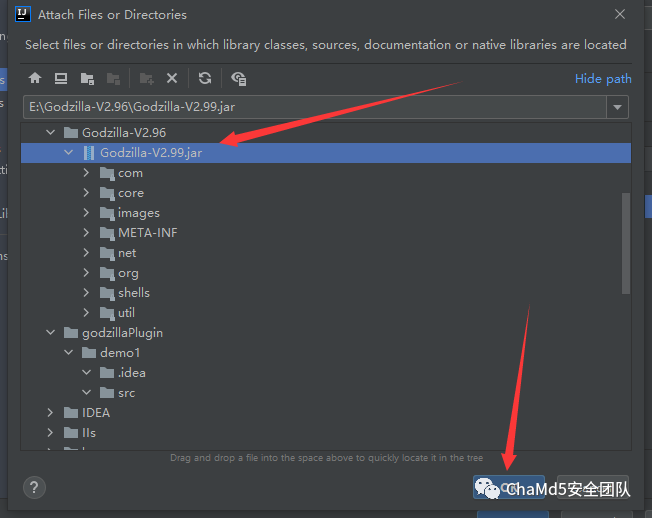
选择哥斯拉Jar包的路径,并点击OK
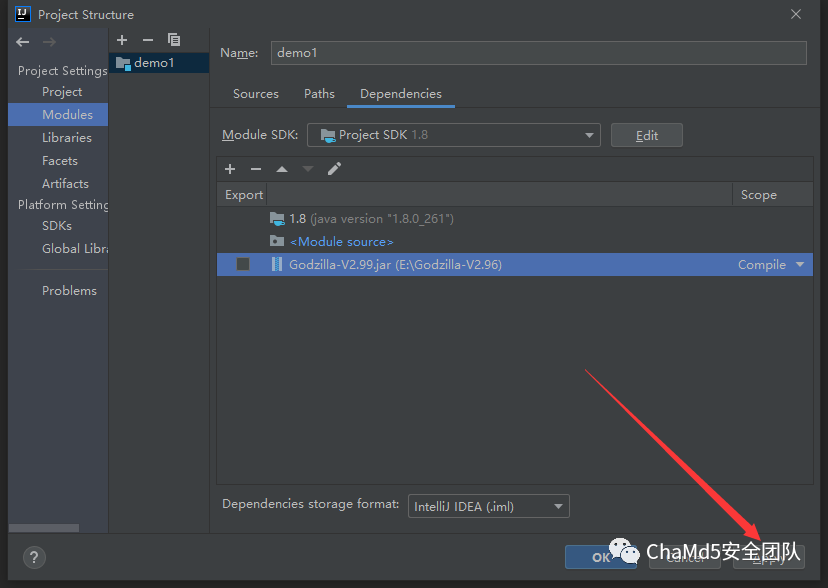
选择依赖模式,编译

然后点击Apply应用即可
然后右击Src文件夹,选择新建一个包

包名必须是以shells.plugins.任意字符为开头
包名的最后建议填入网络ID、作者名

我这里填beichendream
shells.plugins.你的网络Id
shells.plugins.beichendream
编写插件
之后我们新建一个类并声明core.annotation.PluginnAnnotation注解,然后继承并实现core.imp.Plugin接口。
我们可以做一些有意思的操作了。
在下面的代码我们实现了获取哥斯拉的版本,当前web路径,当前用户名,添加一条shell,克隆当前的shell。
代码如下:
package?shells.plugins.beichendream;

import?java.awt.*;
import?java.awt.event.*;

import?core.ApplicationContext;
import?core.Db;
import?core.annotation.PluginnAnnotation;
import?core.imp.Payload;
import?core.shell.ShellEntity;
import?core.ui.MainActivity;
import?util.Log;

import?javax.swing.*;

@PluginnAnnotation(payloadName?=?"PhpDynamicPayload",Name="FirstGodzillaPlugin")?//有效载荷的名字以及插件名??(插件名唯一不可重复)
public?class?FirstGodzillaPlugin?implements?core.imp.Plugin{
????private?JPanel?contentPanel;//?组件内容容器
????private?JLabel?currentGodzillaVersionLabel;//当前哥斯拉版本
????private?JLabel?currentDirLabel;//当前web路径
????private?JLabel?currentUsernameLabel;//当前用户名
????private?JButton?insertShellButton;//添加一条哥斯拉shell的按钮
????private?JButton?copyShellButton;//克隆当前的shell


????private?ShellEntity?shellEntity;
????private?Payload?payload;


????public?FirstGodzillaPlugin(){
????????contentPanel=new?JPanel();//创建组件内容容器

????????currentGodzillaVersionLabel=new?JLabel();//创建标签
????????currentDirLabel=new?JLabel();//创建标签
????????currentUsernameLabel=new?JLabel();//创建标签
????????insertShellButton=new?JButton("添加shell");//创建按钮
????????copyShellButton=new?JButton("克隆当前shell");//创建按钮
????????insertShellButton.addActionListener(new?AbstractAction()?{//响应单击事件
????????????@Override
????????????public?void?actionPerformed(ActionEvent?e)?{
????????????????insertShellButtonClick(e);
????????????}
????????});
????????copyShellButton.addActionListener(new?AbstractAction()?{//响应单击事件
????????????@Override
????????????public?void?actionPerformed(ActionEvent?e)?{
????????????????copyShellButtonClick(e);
????????????}
????????});
????????contentPanel.add(currentGodzillaVersionLabel);//添加组件到容器
????????contentPanel.add(currentDirLabel);//添加组件到容器
????????contentPanel.add(currentUsernameLabel);//添加组件到容器
????????contentPanel.add(insertShellButton);//添加组件到容器
????????contentPanel.add(copyShellButton);//添加组件到容器
????}

????private?void?copyShellButtonClick(ActionEvent?e){

????????Db.addShell(this.shellEntity);//添加当前shell到数据库
????????ShellEntity?resultShell=Db.getOneShell(Db.getAllShell().lastElement().get(0));//因为我们刚才添加了一条shell?所以最后一条shell就是我们添加的
????????MainActivity.getMainActivityFrame().refreshShellView();//刷新shell管理界面的视图
????????Log.log(?String.format("我添加了一条Id为:%s的shell",?resultShell.getId()));//打印日志到控制台
????????JOptionPane.showMessageDialog(this.shellEntity.getFrame(),?String.format("我添加了一条Id为:%s的shell",?resultShell.getId()));//弹框告诉用户添加成功
????}
????private?void?insertShellButtonClick(ActionEvent?e){
????????ShellEntity?shellEntity=new?ShellEntity();//创建一个shell实体
????????shellEntity.setUrl("http://127.0.0.1/shell.php");//设置URL
????????shellEntity.setPassword("pass");//设置连接密码
????????shellEntity.setSecretKey("SuperGodzilla");//设置加密秘钥
????????shellEntity.setPayload("JavaDynamicPayload");//设置有效载荷的名字
????????shellEntity.setCryption("JAVA_AES_IIOP_T3_HTTP");//设置加密器的名字
????????shellEntity.setRemark("这是插件添加的webshell");//设置一个备注
????????shellEntity.setProxyHost("127.0.0.1");//设置代理地址
????????shellEntity.setProxyPort(8888);//设置代理端口
????????shellEntity.setProxyType("NO_PROXY");//设置代理类型?类型种类请看哥斯拉开发Api
????????shellEntity.setEncoding("UTF-8");//设置编码类型
????????Db.addShell(shellEntity);//添加一条shell到数据库
????????ShellEntity?resultShell=Db.getOneShell(Db.getAllShell().lastElement().get(0));//因为我们刚才添加了一条shell?所以最后一条shell就是我们添加的
????????MainActivity.getMainActivityFrame().refreshShellView();//刷新shell管理界面的视图
????????Log.log(?String.format("我添加了一条Id为:%s的shell",?resultShell.getId()));//打印日志到控制台
????????JOptionPane.showMessageDialog(this.shellEntity.getFrame(),?String.format("我添加了一条Id为:%s的shell",?resultShell.getId()));//弹框告诉用户添加成功
????}

????/***
?????*?插件初始化的时候回调用此方法??你可以在这里做一些初始化的操作?比如获取当前路径?但不建议在此处调用payload.include()方法
?????*?*/
????@Override
????public?void?init(ShellEntity?shellContext)?{

????????this.shellEntity=shellContext;//把shell上下文储存到类变量
????????this.payload=this.shellEntity.getPayloadModel();//获取有效载荷并存储到类变量

????????this.currentGodzillaVersionLabel.setText(String.format("哥斯拉版本:%s",?ApplicationContext.VERSION));
????????this.currentDirLabel.setText(String.format("当前web路径:%s",?payload.currentDir()));
????????this.currentUsernameLabel.setText(String.format("当前用户名:%s",?payload.currentUserName()));
????}

????@Override
????public?JPanel?getView()?{
????????return?contentPanel;//返回内容容器
????}

}
编译插件
然后我们编译导出JAR工件

点击OK即可

删除导出哥斯拉Jar包,然后点击Apply应用

点击打包工件

选择我们添加的添加的工件即可
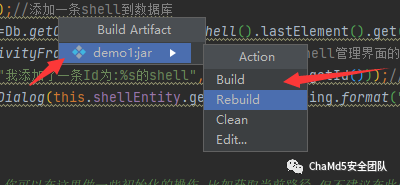
我们看到我们的插件已经编译成功

来个动图展示(在PC浏览器观感较佳)

编写添加到shell管理主页面的插件
随便新建一个类,但是包名必须是shells.plugins.任意字符为开头

然后使用以下Api分别把弹出菜单注册到不同位置
MainActivity.registerJMenu(menu);//注册一个单独的菜单在主页面
MainActivity.registerPluginJMenuItem(pluginMenuItem);//注册一个菜单元素在插件菜单栏下
MainActivity.registerShellViewJMenuItem(shellViewMenuItem);//注册一个菜单元素在Shell管理主页面的右击弹出菜单中
必须在static静态代码块中完成注册菜单。
代码如下:
package?shells.plugins.beichendream;

import?core.ui.MainActivity;

import?javax.swing.*;
import?java.awt.event.ActionEvent;

public?class?FirstGodzillaPluginForMainActivity?{
????static?{
????????JMenu?menu?=?new?JMenu("我是单独的主选项");
????????menu.addActionListener(new?AbstractAction()?{
????????????@Override
????????????public?void?actionPerformed(ActionEvent?e)?{
????????????????JOptionPane.showMessageDialog(MainActivity.getMainActivityFrame(),?"我是单独的主选项?click");
????????????}
????????});

????????JMenuItem?pluginMenuItem=new?JMenuItem("我是插件选项下面的选项");
????????pluginMenuItem.addActionListener(new?AbstractAction()?{
????????????@Override
????????????public?void?actionPerformed(ActionEvent?e)?{
????????????????JOptionPane.showMessageDialog(MainActivity.getMainActivityFrame(),?"我是插件选项下面的选项?click");
????????????}
????????});

????????JMenuItem?shellViewMenuItem?=?new?JMenuItem("我是shell管理页面的右键菜单");
????????shellViewMenuItem.addActionListener(new?AbstractAction()?{
????????????@Override
????????????public?void?actionPerformed(ActionEvent?e)?{
????????????????JOptionPane.showMessageDialog(MainActivity.getMainActivityFrame(),?"我是shell管理页面的右键菜单?click");
????????????}
????????});

????????MainActivity.registerJMenu(menu);//注册一个单独的菜单在主页面
????????MainActivity.registerPluginJMenuItem(pluginMenuItem);//注册一个菜单元素在插件菜单栏下
????????MainActivity.registerShellViewJMenuItem(shellViewMenuItem);//注册一个菜单元素在Shell管理主页面的右击弹出菜单中
????}
}
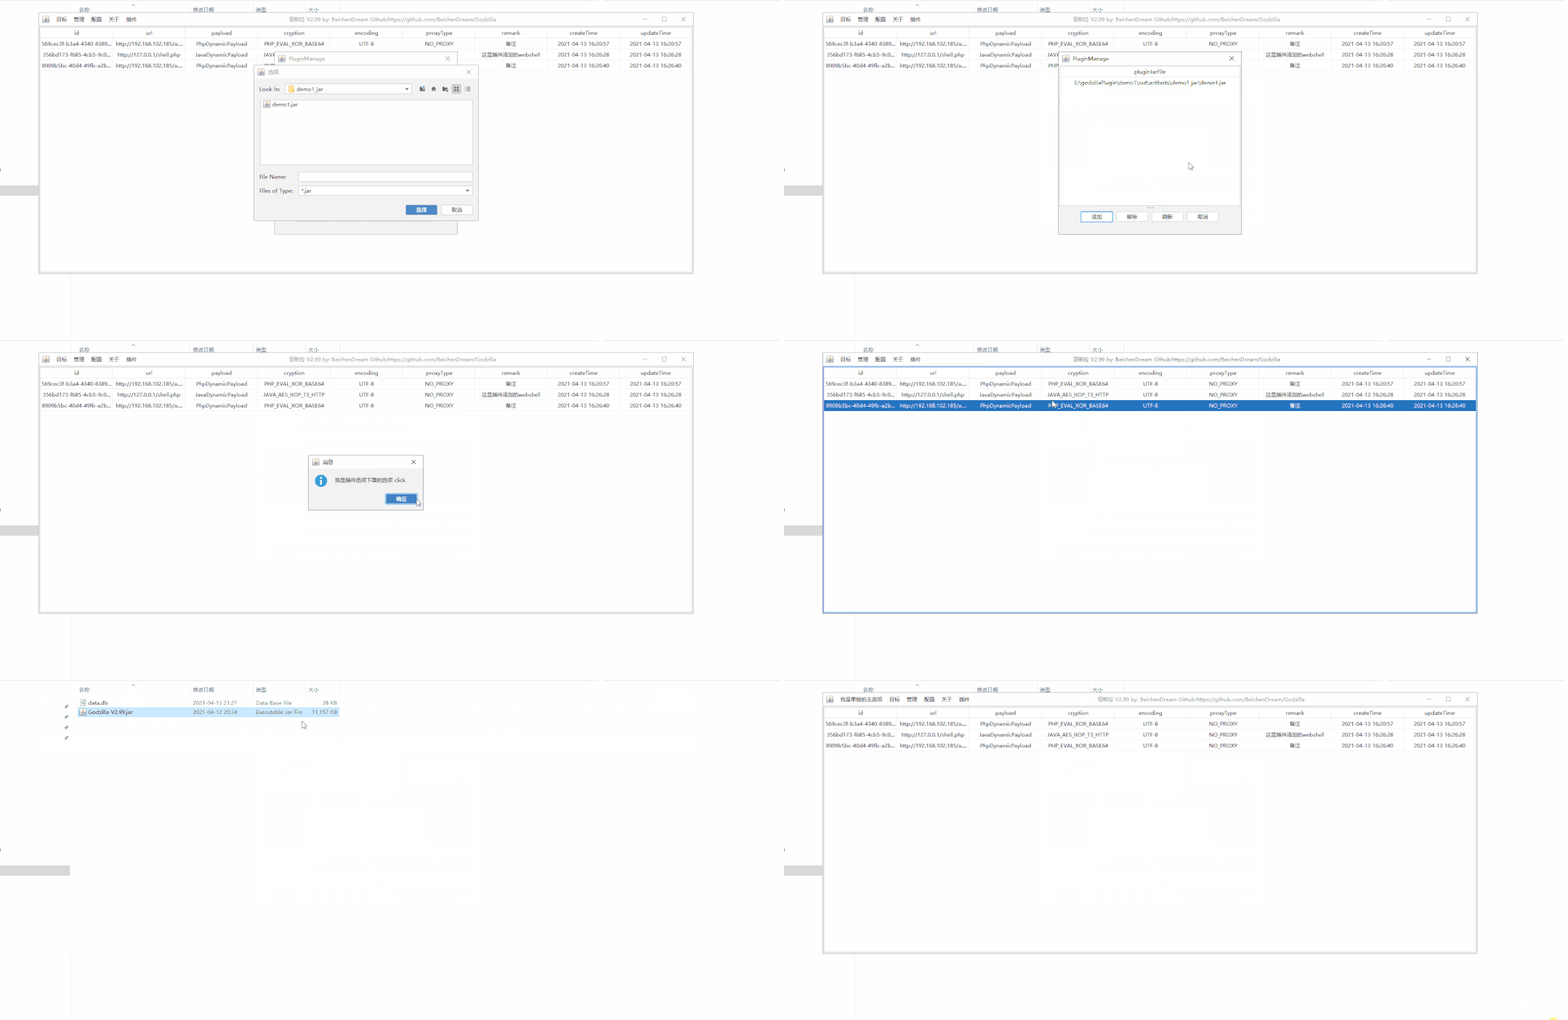
然后按照上面的编译方式进行编译,加载成功后如下,独立的主菜单需要重启哥斯拉后生效。

来个动图展示(在PC浏览器观感较佳)
总结
在上面的插件编写中,我们一共用到了以下Api
ApplicationContext.VERSION?哥斯拉的版本
Db.addShell();//添加一条shell
Db.getOneShell();//根据插件Id获取一条shell
Log.log();//打印日志到控制台
this.shellEntity.getPayloadModel();//获取shell上下文的有效载荷(实际功能模块)
MainActivity.getMainActivityFrame().refreshShellView();//刷新shell管理界面的视图
MainActivity.registerJMenu(menu);//注册一个单独的菜单在主页面
MainActivity.registerPluginJMenuItem(pluginMenuItem);//注册一个菜单元素在插件菜单栏下
MainActivity.registerShellViewJMenuItem(shellViewMenuItem);//注册一个菜单元素在Shell管理主页面的右击弹出菜单中
上面的代码我已经传到Github,大家可以自由学习发挥。
https://github.com/BeichenDream/GodzillaPluginDemo
更多Api骚操作请看哥斯拉Api:?
https://beichendream.github.io/godzillaApi/
敬请期待,在后续的文章中,我会手把手教大家编写,哥斯拉PHP/CSharp/Java的插件。
你的关注是我更新的动力。~比心?
end
招新小广告
ChaMd5?Venom?招收大佬入圈
新成立组IOT+工控+样本分析?长期招新
欢迎联系admin@chamd5.org

关注公众号:拾黑(shiheibook)了解更多
[广告]赞助链接:
四季很好,只要有你,文娱排行榜:https://www.yaopaiming.com/
让资讯触达的更精准有趣:https://www.0xu.cn/
 关注网络尖刀微信公众号
随时掌握互联网精彩
- 1 确保“十五五”开好局起好步 7904592
- 2 多所高校定制羽绒服卖爆 7808135
- 3 故宫下雪了 7712046
- 4 2026年经济工作要这么干 7617127
- 5 感觉时间越来越快不是错觉 7523254
- 6 员工“踢了一脚” 救了老板一命 7426858
- 7 演员印小天在景区救下落水女子 7328697
- 8 不提“雪” 怎么描写雪很大 7236477
- 9 白宫的回应让日本舆论失望了 7136066
- 10 中央经济工作会议释放哪些重要信号 7039894


 Chamd5安全团队


